
Fly fishing and tying tips: The Humungous
With the colder days of the fly fishing year ahead of us, lure style flies really come to the fore on small stillwater fisheries. Hence our fly of the month for November is one of those classic stillwater lure patterns that can be relied on to keep the takes coming. This month’s blog provides some fly fishing tips and a handy step by step guide to tying one of the all time greats, the Humungous.

Although it’s a regarded as something of a classic for rainbow trout in small, stocked fisheries, this design of the humungous fly pattern actually originates from the waters of Loch Leaven in Scotland. It was here that the fly gained infamy for catching big brown trout.
These days, however, the original has spawned a number of variants worthy of a place in any fly box. Our range includes classic olive coloured patterns, along with black and silver and viva style variants and even versions in hot orange and Cat’s Whisker hues.

Fishing the Humungous
Like other lures for trout, there is a lot more to catching fish than launching the thing out and stripping like a madman. You could indeed try a few quick retrieves high in the water to kick off, but should no early chases or takes commence, try counting down to different depths to find the fish.
A slower and steadier retrieve also keeps the fly deeper, holding it in the taking zone. A figure of eight, with regular twitches thrown in is ideal. You could fish it on a floating line with a longer leader between a rod’s length to twelve feet. There is little need to go any lighter than 8lb fluorocarbon.
Should you want to retrieve faster at depth, you could try a sinking fly line and a shorter leader of just six or seven feet. If you do bring it in quickly though, do be sure to throw at least one pause into the mix each cast. A little “break” in the retrieve can often be the trigger for a fish to hit the fly as it stutters and speeds up again.
Last but not least, try to make a mental note of how long you had let the fly sink when the bites come. If the action is hard and fast, or you use the same flies for more than one session, a hook sharpener is also an excellent idea to keep the point nice and sharp.
How to tie the Humungous
Colour choices are quite wide for this fly pattern and humungous variants are numerous. For extra attraction however, we would recommend a touch of extra flash in the tail and body materials (our UV Multiflash and UV Fritz are ideal for adding some extra sparkle!).
The other notable feature is the weighted head. Chain eyes do the job perfectly, but you could also try larger eyes, such as tungsten dumbbell eyes to create a fast sinking trout lure for really deep waters.

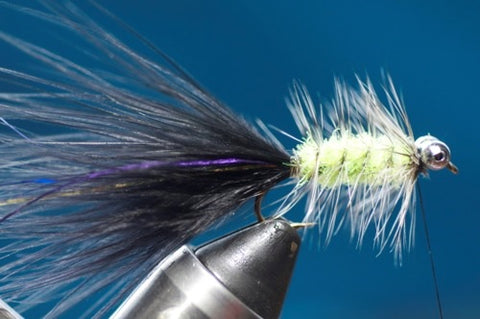
In this case, however, we have chosen classic Viva style colours, with a black marabou tail and green body.
Humungous (Viva variant)
Hook: Long Shank Lure Size 8-10
Thread: Standard Black
Eyes: Bead chain eyes
Tail: Black Marabou, with a hint of Turrall UV Multiflash
Body: Green Fritz Chenille
Hackle: Palmered grizzle cock
Step 1: Run some black thread just behind the eye of the hook, until it catches.

Step 2: Now pinch the chain eyes just above the hook, behind the eye. Carefully bind in place, using tight turns of thread in an X shape, as shown. Build up plenty of tight turns for security here- and you could also add a spot of varnish as you do so.

Step 3: Now run the thread towards the hook bend with a series of tight turns. Stop when you are above the hook point.

Step 4: Now for the tail. This is easiest to tie in two parts rather than one bunch of material. Start by snipping off a pinch of black marabou and measuring against the hook. A tail that protrudes about the same length as the hook itself is about right.

Step 5: Once you have bound the first pinch of marabou in place right along the back of the hook, you can then add a little sparkle. You needn’t go too crazy; 4 or 5 strands of flash is ample. As with the marabou, you will create a more secure, even body by tying right the way along the back of the hook, rather than securing just at the end.

Step 6: Now add another pinch of marabou of similar size to the first to complete the tail.

Step 7: Now take a grizzly cock hackle and tie securely along the hook as shown, so that you have plenty of feather to work with.

Step 8: Take a section of chenille and strip away the outer to reveal the core. Strip away enough so that you can tie this right the way along the back of the hook, as shown.


Step 9: Now make a body using even, touching turns of chenille, before tying off and trimming just behind the chain eyes.

Step 10: Now wrap the feather around the hook in open, evenly spaced turns, like this. Make an extra couple of turns just behind the eyes to make the head a little bushier.

Step 11: Secure in place with 2-3 tight wraps of thread before trimming the hackle off.
Step 12: Now ring the thread so it sits just in front of the chain eyes. Here’s a useful fly tying tip for any pattern: Rather than only appealing varnish at the end, try applying a little directly to the thread before you whip finish, as shown. This way, the varnish will set right inside the knot, rather than just coating it.

Step 13: Whip finish and trim to complete.

Last of all, do have some fun and try your own colour variants. Sometimes one colour scheme will outfish the rest. Bright colours can be deadly for stockies, while a predominantly olive or black version is also worth a cast for brown trout too.
Keep an eye on all our latest releases and happy fishing to all.


Which knot is used to tie the fly to a Tippett. Regards John
Leave a comment